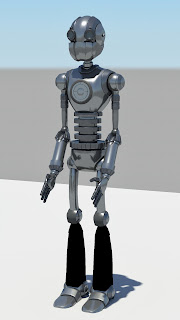
This is more or less what I was given from Scott, who modelled the scene a few months ago and has been on at me ever since to texture it.
This is what I handed off after texturing and paint effects work.
And this is what Scott did with lighting, rendering and comp. Pretty sweet results! The next step is to see how Anna fits in with this shot. She was also textured using the mia_material_x shader.
Here's a pretty bare image of the grass library I created. The idea with all this is that I have the paint effects strokes I like set up in a scene file complete with mia_shaders. I can then draw paint effects in a scene that will be used, convert to poly's and import these shaders I have already set up and plug them in.
The default phong shaders the paint effects get when you first convert to polygons are pretty poor at handling reflection and translucency compared to the mia_material_x shader.
Over on my own film project, The Divided, I recut the animatic and added some different shots for the ending. Because we changed the ending slightly a few weeks ago, some of the existing storyboard shots were no longer working. They're had to be more aggression in the final part when Six is marching towards Rob. We'll be reviewing this at the production meeting on Monday. I am expecting some more timing tweaks and possibly some suggestions on tidying up the last scene a bit more shots wise. It's nearly there but still not quite right I feel.
Also for Divided I have started texturing Rob. Nothing greatly interesting for now. Just flat colours and mia_materials.The shins are getting a wee modelling fix to them so I've held off starting them for now incase the UVs need tweaked. Quite pleased with how he is looking. Very clean and shiny. It should make for a nice contrast with the large, grubby, aged Six.
I am still niggling away at the NURBS modelling and texturing when I can. It's a good opportunity to play with procedural textures a bit more. Again, all textured using my best friend, the mia_material_x shader. The wall bumps are created using noise and fractal nodes plugged in through a layered texture node. The fractal is acting as a mask for the bump strips.
This is by no means final. I still will play with the shader attributes on the wall and desk once I have more geometry in the scene. I'm aware that the lighting is hideous. That'll change. The carpet for now is just a bumpy noise texture. I'll maybe have a look at using maya hair or some other software/plugin for that at a later stage.
The last thing I have is some procedural texture work for Birte. She had a very large area of her shot she was texturing but run into some quality problems using texture maps. Even at 8k they were still blurry and pixelly.
I'm not entirely sure what the best solution for this kind of problem is yet. We are facing similar problems on The Divided and Papa for texturing large areas of open ground.
What sprung to mind at first was just texturing what is required per shot. But this only works if the camera isn't moving a lot and taking in lots of that area. The next idea was breaking the wall into separate objects and chopping up a really large image in photoshop so that it all tiles together neatly. And the last idea was to make the texture map seamless in photoshop and find a way of repeating it across the entire surface.
All possible solutions? I don't know yet. I can try them some other time. What I was interested in trying this time was using procedural textures to match the pattern of the existing map.
Above is a small example (less than quarter of the map they were using.)
I was fairly confident I could remake this map using Mayas procedural shaders.
Here is what I came up with. This image is not perfect match but the network of ramps can easily be tweaked to get it close to a perfect match by thinning down the width of the lines on the ramp nodes.
And here is a wee screenshot of the shading network. It's a series of ramps used for the diagonal and vertical lines with masks with vertical lines as well all connected and layered up through a layered texture.
The width, angle and repeats of the lines can all be changed in the placement and ramp nodes quite easily.


No comments:
Post a Comment